

Article: Wisteria Bloom Socks | Free sock pattern with lace
Wisteria Bloom Socks | Free sock pattern with lace
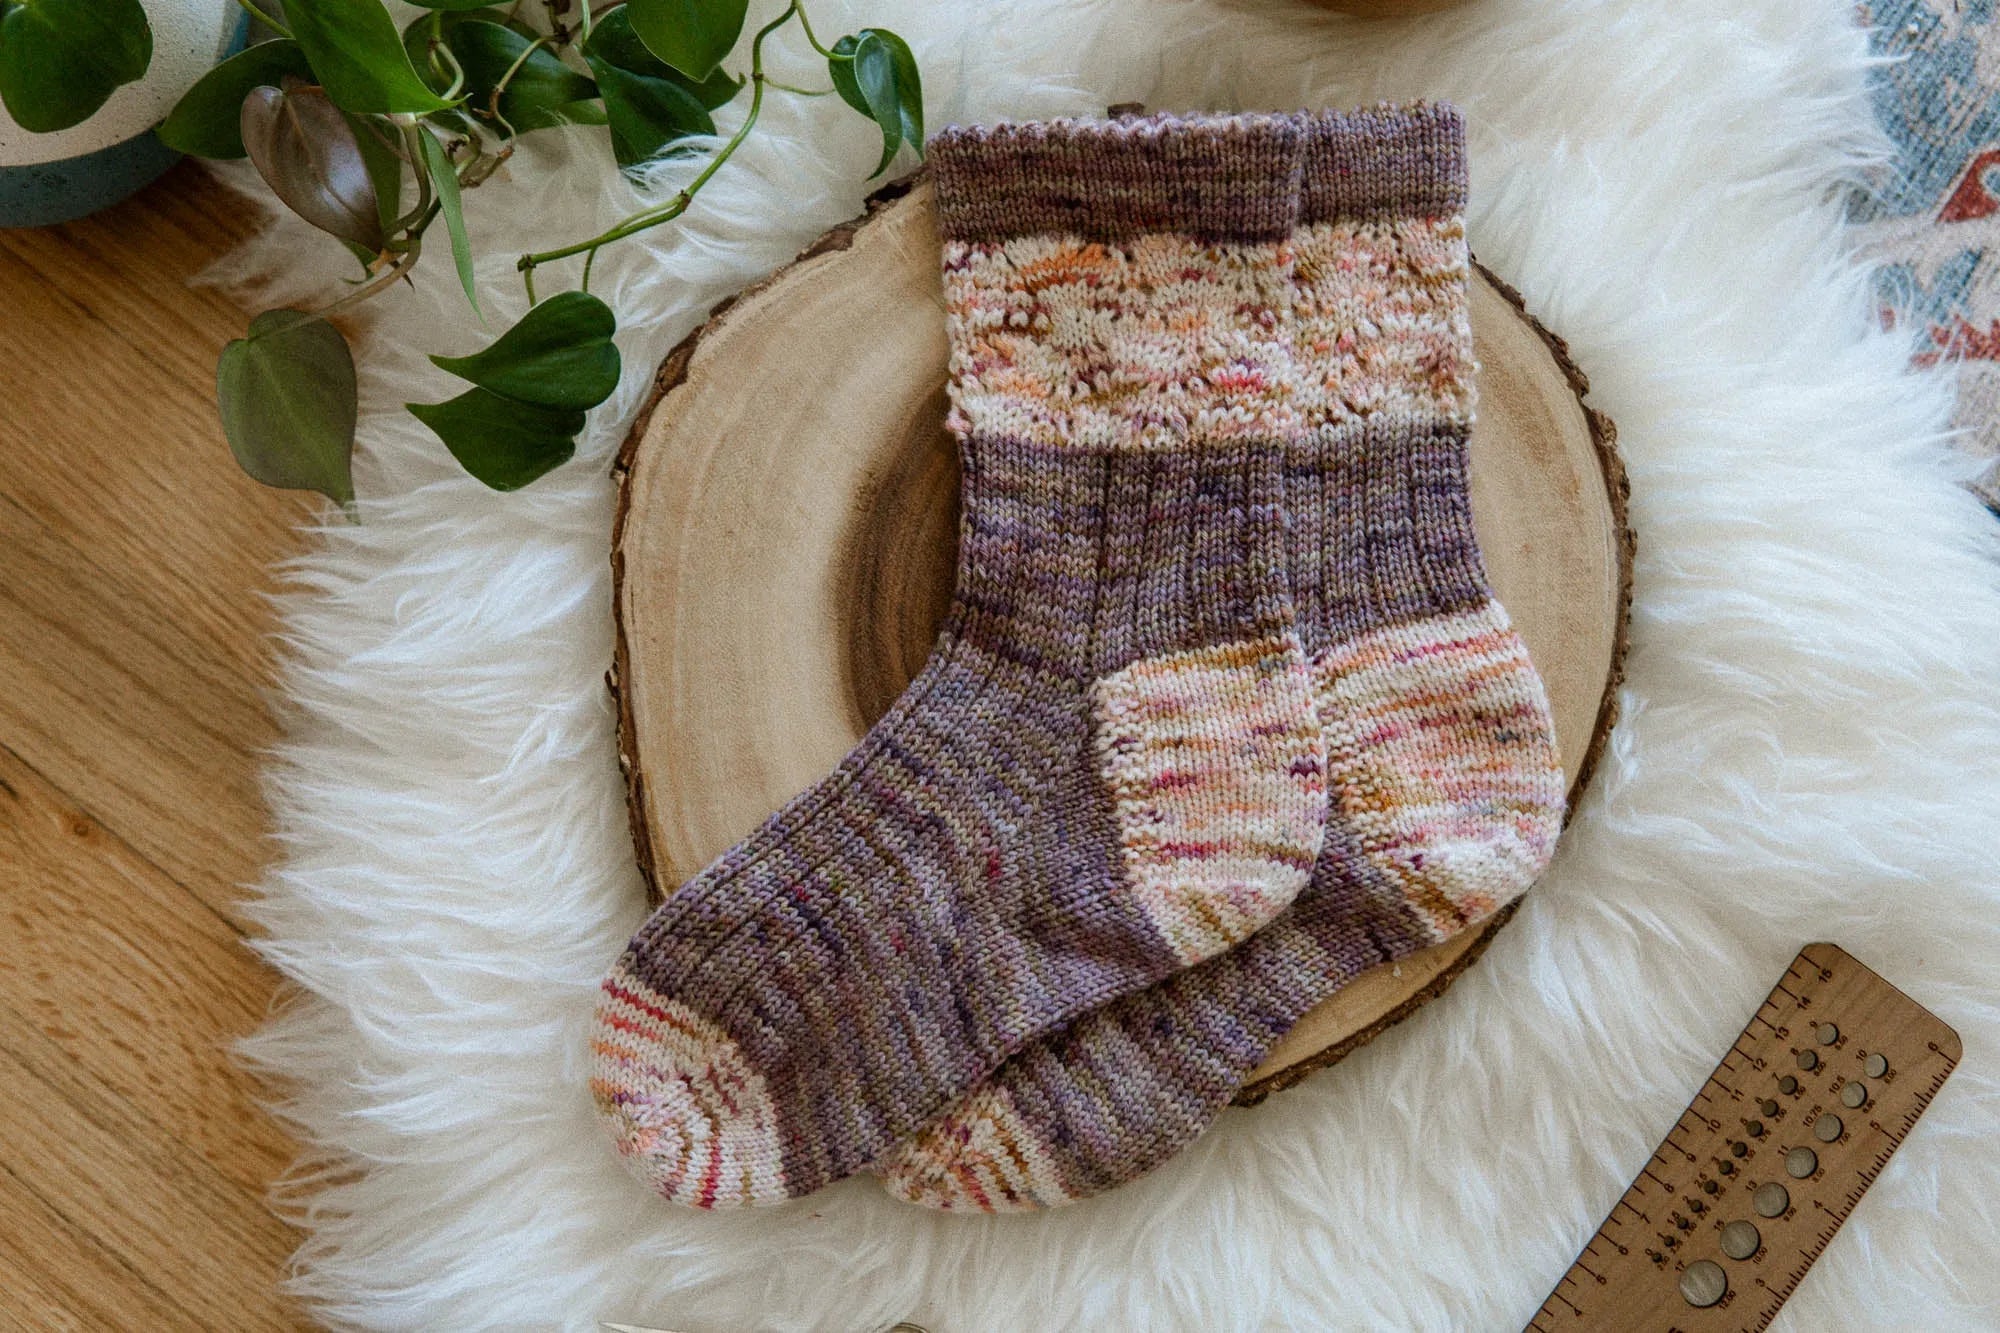
This free sock pattern for the Wisteria Bloom Socks is a great pattern by Aimee Sher. These socks are bursting with color and texture like wisteria flowers in full spring bloom. Work these easy socks work top down in interesting sections that just fly by.
It's designed in our Trusty Sock yarn by Big Little Yarn Co which come in the dreamiest colors! Read on for this free knitting pattern with full instructions for beautiful knit socks.
This free pattern is supported by ads on this page. If you'd like to purchase the printable, ad-free PDF for this pattern, the Wisteria Bloom knitting pattern is available for 25% off when you purchase it with any sock yarn (automatically applied). This blog post will always be free.

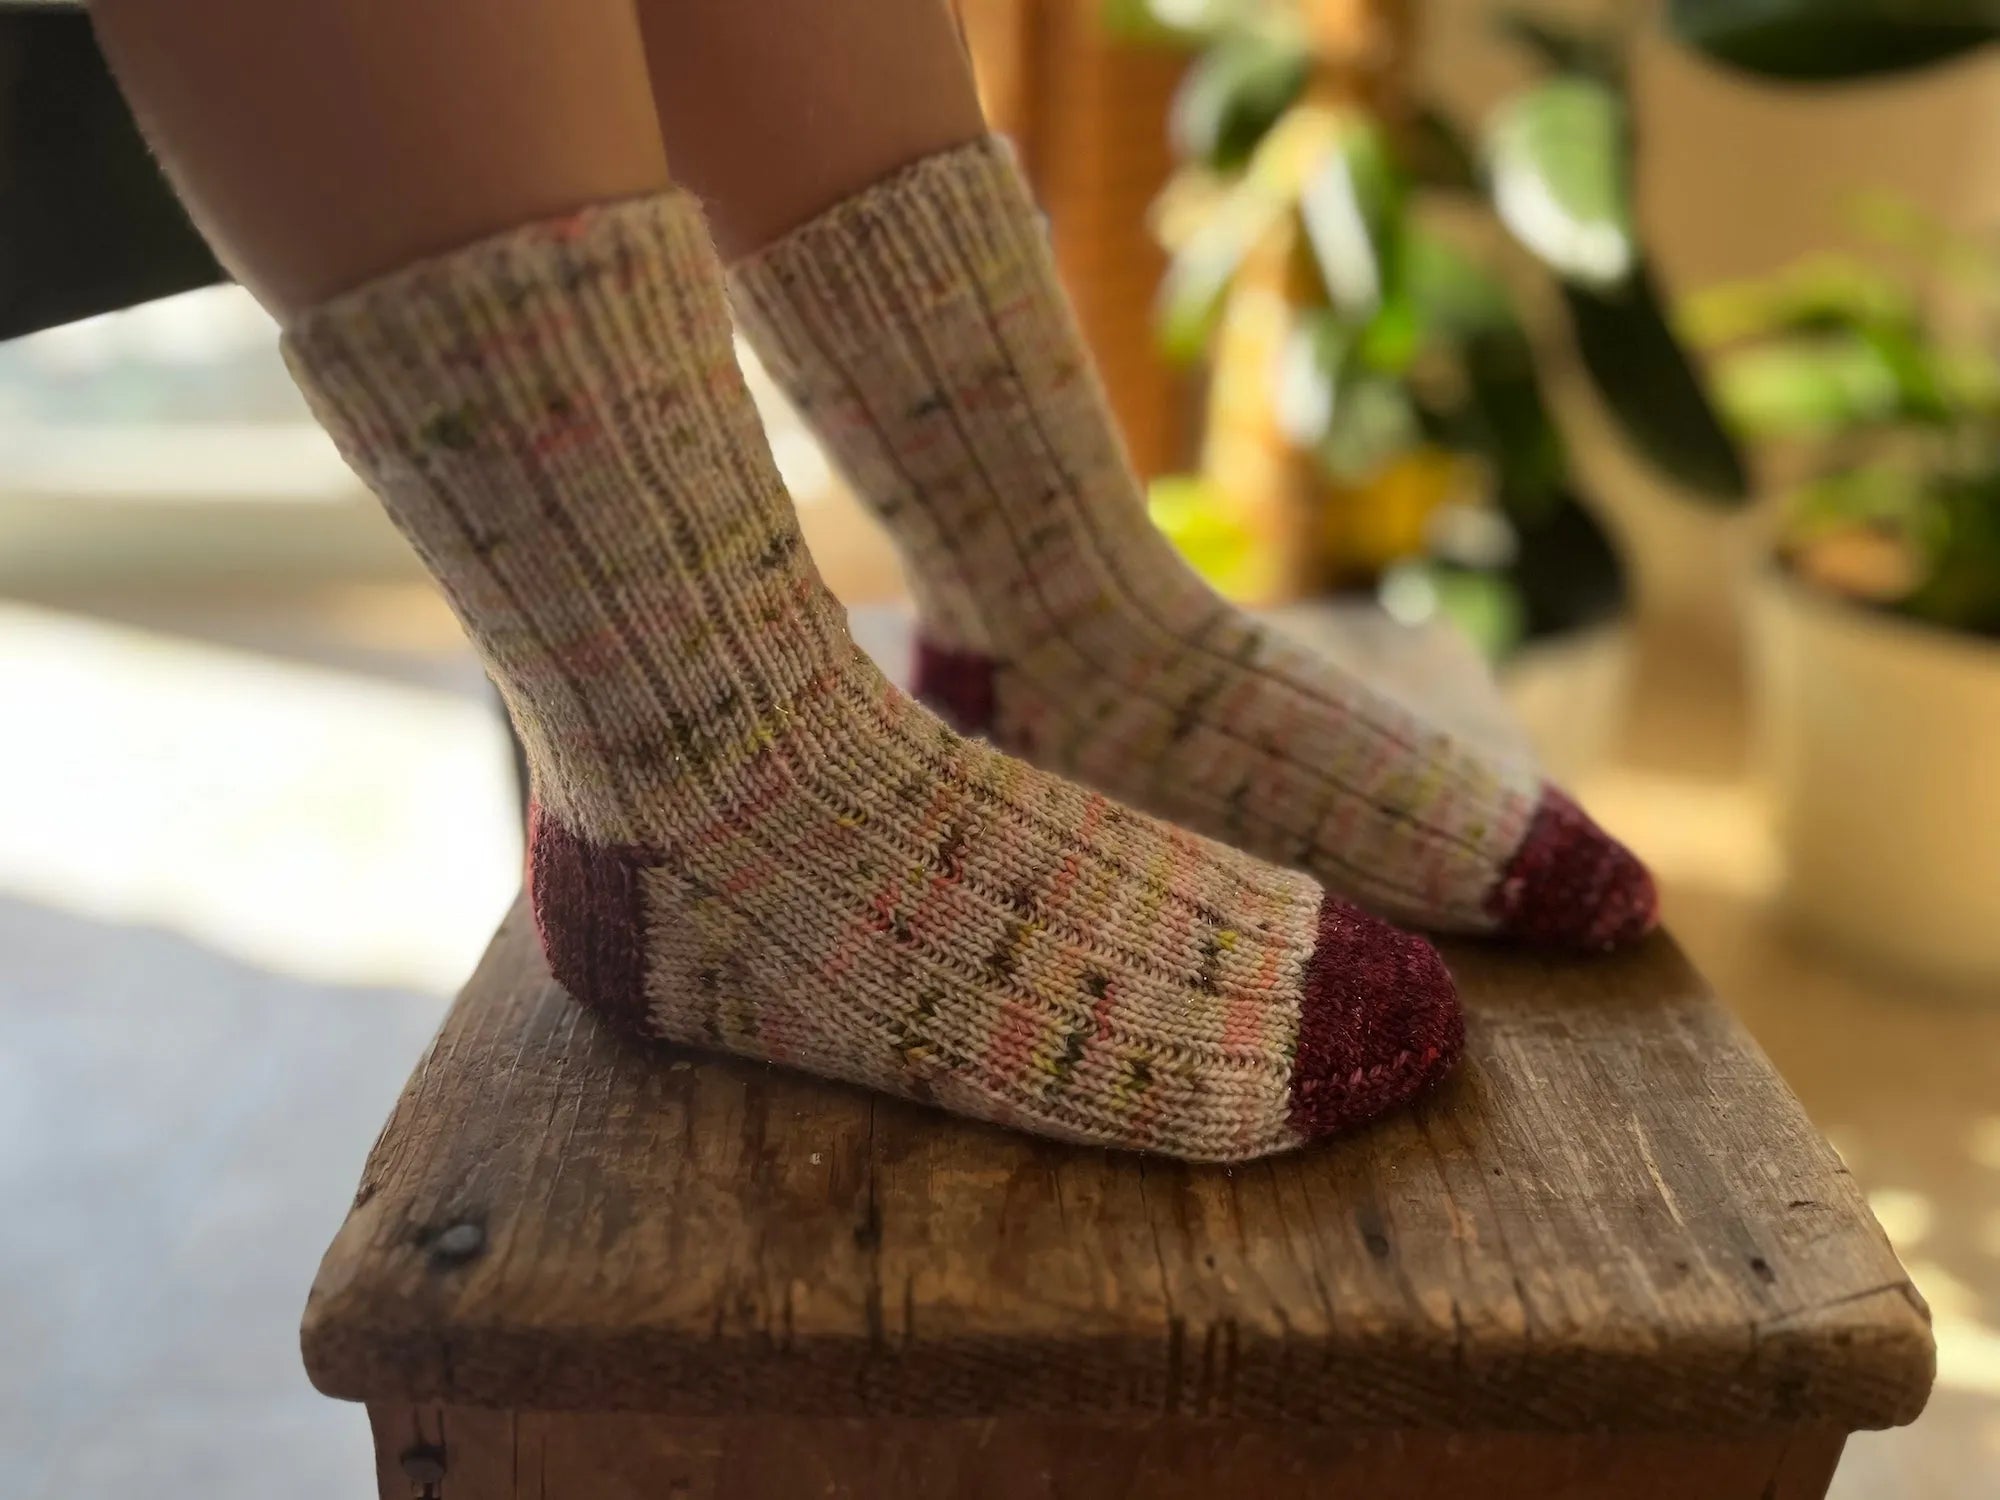
The engaging contrast floral lace texture is easy to memorize and soothing to knit. Meanwhile, ribbed leg and foot sections give a beautiful and cozy fit.
The delicate stockinette cuff is sweet and adds the perfect whimsical touch for perfect pairs of socks to wear on a walk to the botanical gardens.
And as a bonus, the hidden ribbed foldover facing on the inside achieves a perfect fit.
Enjoy knitting socks in your favorite yarn colorway to create the most perfect floral, lacy socks for you. The contrast color does not need too much yarn, so it's a great way to use up some leftover fingering yarn from any project.
Sizes
A (B, C) with the finished foot circumference of 7 (8, 9)” / 17.8 (20.5, 23) cm.
Foot length and leg length are adjustable. Leg measures 6” / 15.5 cm from the picot fold-over edge to top of heel flap after finishing.

Gauge
32 stitches and 40 rounds = 4x4” / 10x10 cm, stockinette stitch knit in the round, unblocked.
Lace and rib sections variable in gauge as they’ll stretch to fit the cuff size knit.
Materials


2 skeins of Big Little Yarn Co Trusty Sock in the colorways Wisteria (main color, left) and Azalea (contrast color, right)
OR any fingering weight sock yarn in the following amounts:
- Main Color: 220 (230, 245) yards / 200 (210, 224) meters
- Contrast Color: 109 (150, 160) yards / 100 (137, 146) meters
Suggested Needles
Size US1.5 / 2.5mm in your preferred method for knitting in the round for small circumference, such as small circular needles, double-pointed needles (addi FlexiFlips), or magic loop on long circular needles.
If you are using small circulars, you will then also need DPN’s in the same size for the heel flap and the toe.
Notions
- 2 stitch markers
- unique stitch marker for the beginning of round
- tapestry needle (affiliate link to KnitPicks)
Abbreviations
- BOR - Beginning of Round
- CC - Contrast Color
- CO - Cast On
- K - Knit
- K2tog - Knit the next two stitches together as if they are one stitch
- M1 - Make one stitch
- MC - Main Color
- P - Purl
- PM - Place Marker
- P2tog - Purl the next two stitches together as if they are one stitch
- RS - Right Side
- Sl - Slip purlwise
- SM - Slip Marker
- SSK - Slip one stitch knitwise, put it back on left needle, knit two stitches together through back loop.
- St(s) - Stitch(es)
- WS - Wrong Side
- Wyif - With yarn in front
- Wyib - With yarn in back
- yo - yarn over
Pattern
Picot Edged Cuff
Using main color (MC) and a German Twisted cast on (video tutorial), and rewerving a longer tail than usual for the fold-over cuff, cast on 56 (64, 72) sts. Place marker for beginning of round (BOR) and join to work in the round.
Knit 2 rounds.
Rounds 3-9: With CC, *K1, P1; repeat from * to BOR.
Switch to MC. Meanwhile, you can either break CC or loosely carry it up the back for the next section.
Knit 2 rounds.
Round 12: *K2tog, yo; repeat from * to BOR.
Rounds 13-27: Knit to BOR.
Tip: At this point, you can wind the previously reserved yarn in a figure-8 loop. Then, secure it to the cuff with a hair clip or clothespin. This will prevent it from tangling with the different ends in the rest of the work.
Leg
Break MC and join in CC.
SIZE A ONLY
Lace Round 1: Using CC, *K2tog, K26; repeat from * once to BOR.
SIZE B ONLY
Lace Round 1: Using CC, K2tog, K to BOR.
If working in magic loop, arrange your stitches so that there are 27 sts (3 repeats of lace chart) on one needle. Thus, there are 36 sts (4 repeats of lace chart) on the other.
SIZE C ONLY
Round 1: Using CC, knit 1 round.
RESUME ALL SIZES
54 (63, 72) sts
Tip: While working the lace chart in the following section, you will often encounter a yo at the end of the needle if you are working with anything other than a small circular needle. Be sure to check to make sure you have not dropped this stitch when you come to it, and work the yo as a knit stitch on the following round every time to maintain stitch count.
Lace Chart
Work from the following lace chart, or from written instructions a total of 6 (7, 8) times around to BOR OR from knit from the written instructions.
Note that both the written and charted instructions start on Round 2 to account for the set-up round previously worked.

Written Version
Round 2: K to BOR.
Round 3: *K1, SSK, SSK, SSK, yo, K1, yo, K1, yo; repeat from * to BOR.
Knit 3 rounds.
Round 7: Repeat Round 3.
Knit 3 rounds.
Round 11: Repeat Round 3.
Knit 3 rounds.
Round 15: *K1, yo, K1, yo, K1, yo, K2tog, K2tog, K2tog; repeat from * to BOR.
Knit 3 rounds.
Rounds 19: Repeat Round 15.
Knit 3 rounds.
Round 23: Repeat Round 15.
Round 24: K to BOR.
Leg, Continued
SIZE A ONLY
Set Up Round *K1, M1, K26; repeat from * once to BOR.
SIZE B ONLY
Set Up Round: K1, M1, K to BOR.
If you previously rearranged your sts, arrange them back to 32 sts on each needle.
SIZE C ONLY
Round 25: K to BOR.
RESUME ALL SIZES
56 (64, 72) sts
Break CC.
Round 1: Using MC, *K3, P1; repeat from * to BOR.
Repeat Round 1 until the sock measures 6” / 15.5 cm in length from the picot row (not from cast on, since the cuff will be folded over at the picot edge) or desired length before heel flap.
Heel Flap
Set up row: Using MC, *K3, P1; repeat from * across the first 28 (32, 36) sts. Put these sts on hold and remove BOR marker.
Do not break MC. Switch to CC for heel flap, which using the other half of stitches, you will work back and forth in stockinette st with a garter edge. TThe first 3 sts of every row are always knit.
Row 1 (RS): Using CC, K across 28 (32, 36) sts of heel flap. Turn.
Row 2 (WS): K3, P to 3 sts before end of row, K3. Turn.
Repeat Rows 1 & 2 of heel flap 14 (15, 16) times for a total of 30 (32, 34) rows worked. There will be 15 (16, 17) garter bumps.
Heel Turn
Row 1 (RS): Sl1 with yarn in back, K15 (17, 19), SSK, K1. Turn.
Row 2 (WS): Sl1 with yarn in front, P5, P2tog, P1. Turn.
Row 3 (RS): Sl1 with yarn in back, K to 1 st before gap, SSK, K1. Turn.
Row 4 (WS): Sl1 with yarn in front, P to 1 st before gap, P2tog, P1. Turn.
Repeat Rows 3 & 4 until all sts are worked. On the final repeat you might end up with no sts after the SSK and P2tog to work before the turn at the end of the row. That’s OK—skip that stitch and turn. You'll end on a WS row.
16 (18, 20) sts remain on the heel.
Heel Gusset
Break CC. We will now pick up MC where we previously left it at the left edge of the heel flap and work in the round again, using the stitches on hold as well as the heel stitches, to pick up gusset along the garter edge we created during the heel flap section.
Set up Round 1: PM for gusset decrease where the MC ended. With MC, pick up and K15 (16, 17) sts (one st before each purl bump). K8 (9, 10) across half the heel sts, place unique marker for BOR.
Set up Round 2: K8 (9, 10) across the rest of the heel sts. Pick up and K15 (16, 17) across the other side of the heel flap (one st after each purl bump to match the other side symmetrically). PM for gusset. *K3, P1, repeat from * until 1 st before side marker, K1, SM, K to BOR.
From here forward, work the top of foot as established in the K3, P1 rib pattern, BUT knitting the last stitch of the top of the foot (ending the rib one stitch early).
Gusset Decrease Round 1: K to 3 sts before marker, K2tog, K1, SM, *K3, P1, repeat from * until 1 st before side marker, K1, SM, K1, SSK, K to BOR.
Gusset Decrease Round 2: K to marker, SM, *K3, P1, repeat from * until 1 st before side marker, K1, SM, K to BOR.
Repeat Gusset Decrease Rounds 1 & 2 until 56 (64, 72) sts remain.
Foot
Set up round: Remove BOR marker, K14 (16, 18); remove marker, place BOR marker; *K3, P1, repeat from * until 1 st before side marker, K1, SM, K28 (32, 36) to new BOR marker.
Round 1: *K3, P1, repeat from * until 1 st before the side marker, K1, SM, K to BOR.
Repeat Round 1 until the sock is 1.75 (2, 2) “ / 4.5 (5, 5) cm from desired length.
Toe Decreases
If you are knitting using a small circular needle, you may want to switch to DPNs or magic loop to complete the toe decrease rounds.
Break MC, and join in CC.
Round 1: K to BOR.
Round 2: *K1, SSK, K until 3 sts before marker, K2tog, K1; repeat once more to BOR. Decreased 4 sts.
Repeat Rounds 1 & 2 until 20 (20, 24) sts remain.
Second Sock and Finishing
Repeat pattern identically as for first socks. Reserving about 12” / 30 cm of CC, break CC. Using a tapestry needle threaded with this yarn, kitchener stitch across the sts to graft the toe.
Weave in all ends except the reserved yarn from the cast on. Fold over the cuff along the picot edge, so that the contrast ribbing section lays inside the sock.
Using the reserved 24” / 60 cm of MC from the cast on, sew the cuff facing down very loosely, stretching the fabric periodically as you go. Do NOT trim excess yarn.
Try sock yarn on to ensure that the cuff has not been seamed too tightly, and wet-block, either on a flat surface or on blockers to your desired finish. Then, after you’re sure that the sock will stretch to fit with your sewn finish (adjusting as needed), trim any excess yarn.

Enjoy your beautiful warm weather socks with a bouquet of your own or a walk in nature! I’d love to see what you come up with using the hashtag #WisteriaBloomSocks everywhere.
Looking for more inspiration?
- Check out all of our size-inclusive knitting patterns, which include more sock knitting patterns.
- Read about the different needles that we love to knit socks on.
- Shop all of our luxury, hand-dyed sock yarns.